Learn how to integrate phone authentication using Firebase in your Laravel application. Enable phone authentication, and verify users via OTP. Enhance security and streamline user authentication with this powerful combination of Laravel and Firebase.
Note : If you have not setup firebase project or do not have configuration keys then check our post on, How to create a firebase project and obtain configuration file?
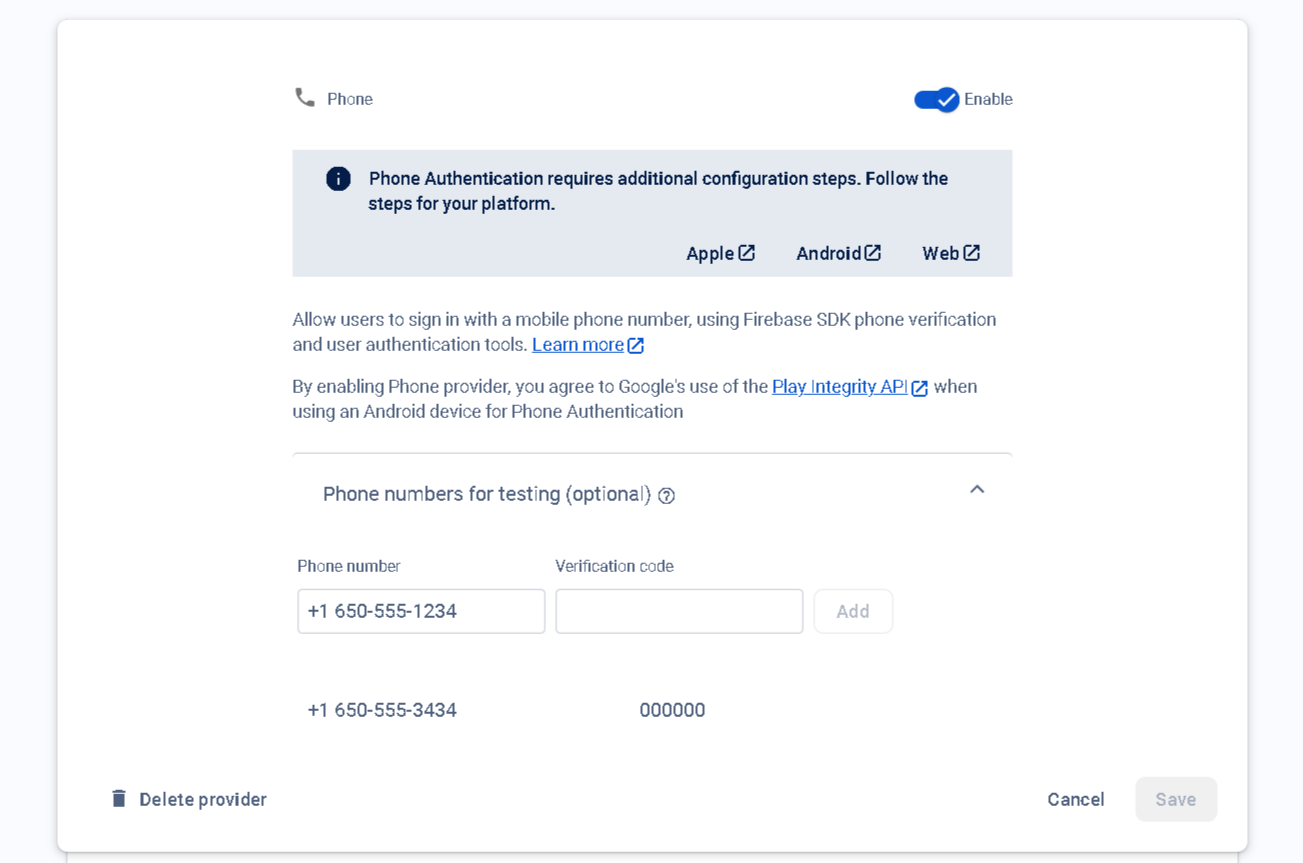
Note 2 : Make sure to enable 'Phone' in Authentication -> Sign-in method
Step 1 : Make Auth Controller
To create a controller please execute the provided command.
php artisan make:controller Firebase/AuthControllerStep 2 : Create Routes.
Next, we'll construct a login and registartion form. Following this, we'll process login and registartion. So, let's start by creating some routes in the web.php file.
use App\Http\Controllers\Firebase\AuthController as FirebaseAuthController;


// FIREBASE AUTH ROUTES

// register
Route::match(['POST','GET'],'sign-up', [FirebaseAuthController::class, 'signUp'])->name('sign-up');
// verify mobile no.
Route::post('ajax/verify-mobile', [FirebaseAuthController::class, 'verifyMobile'])->name('verify-mobile');
// login after otp verified
Route::post('ajax/login-otp', [FirebaseAuthController::class, 'loginOtp'])->name('login-otp');Step 3 : Registartion Form and Processing
We'll create a function named 'signUp' in 'Firebase/AuthController.php'. This function will be responsible for showing registration form and processing registration.
public function signUp()
{
    return view('firebase.auth.register');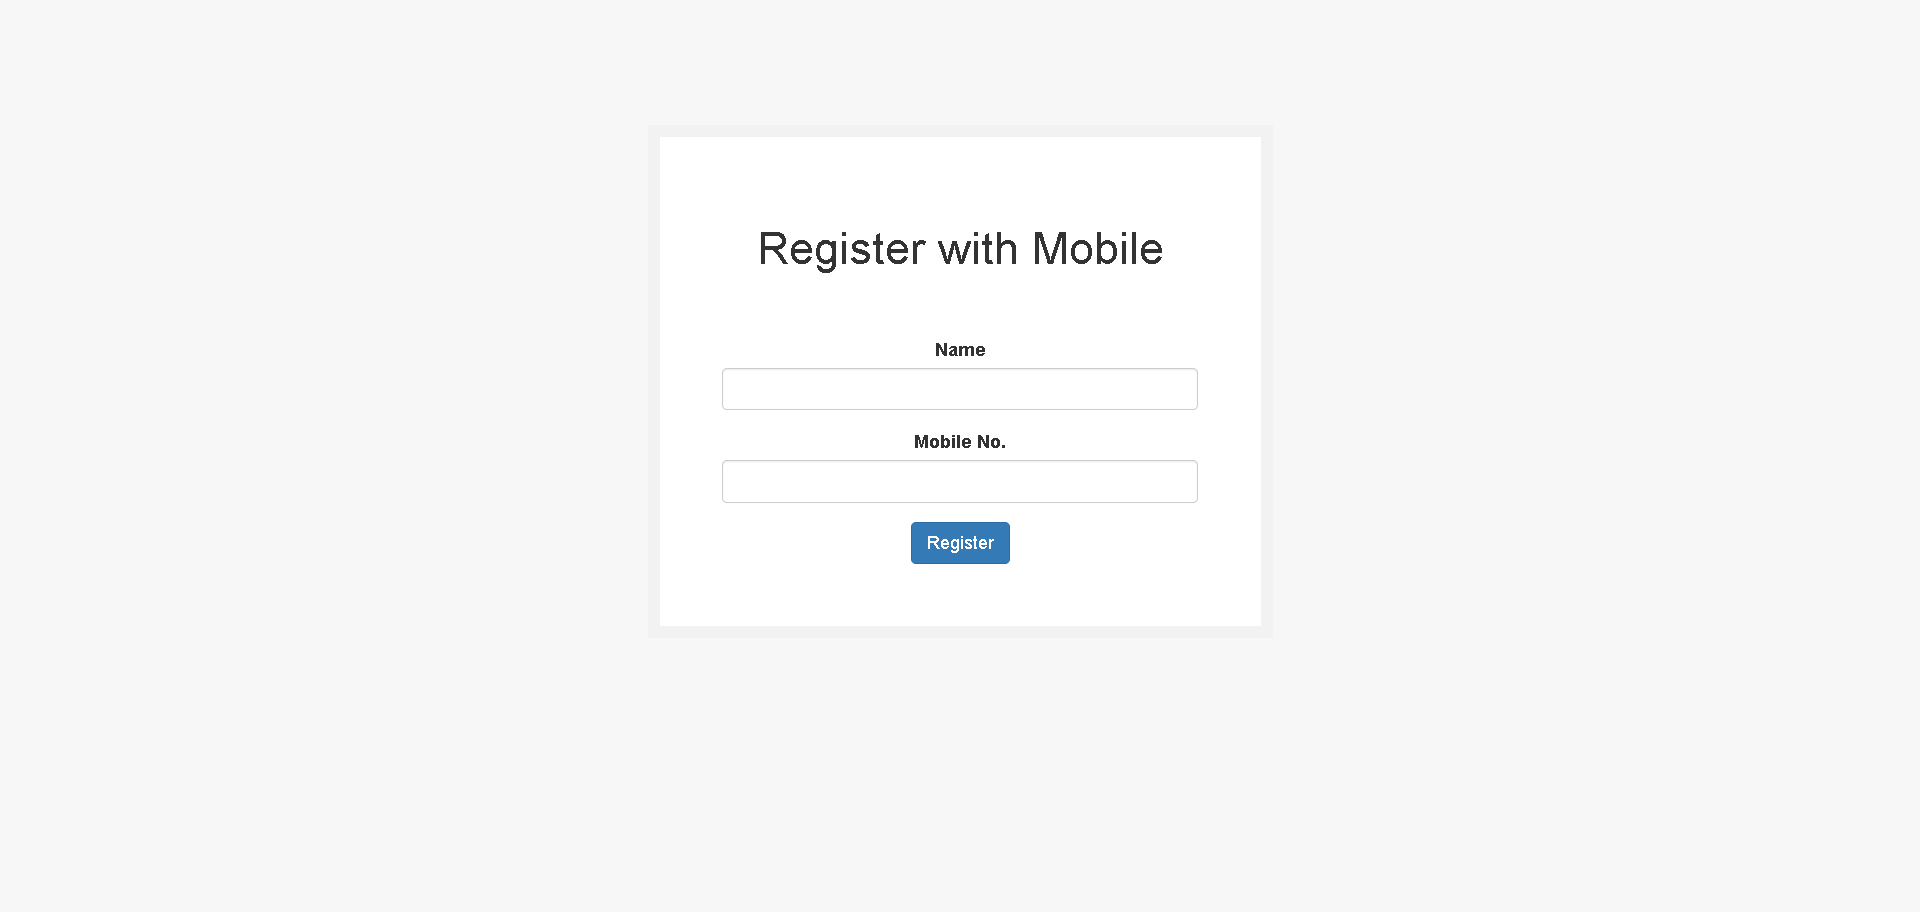
}resources/views/firebase/auth/register.blade.php
<!DOCTYPE html>
<html lang="en">
<head>
    <meta charset="utf-8">
    <meta name="viewport" content="width=device-width, initial-scale=1">
    <title>Firebase - Register with Mobile</title>
    <!-- BOOTSTRAP -->
    <link href="https://maxcdn.bootstrapcdn.com/bootstrap/3.3.6/css/bootstrap.min.css" rel="stylesheet" />
    <!-- Styles -->
    <style>
        body {
            background: #f7f7f7;
        }

        .form-box {
            max-width: 500px;
            margin: auto;
            padding: 50px;
            background: #ffffff;
            border: 10px solid #f2f2f2;
            margin-top: 100px;
        }

        h1, h4, p {
            text-align: center;
        }

        input, textarea {
            width: 100%;
        }
    </style>
</head>
<body>
<!-- Mobile number will be placed here for login after OTP Verification, You can store in JS variable as well -->
<input type="hidden" id="number-to-register">

<!-- Register Section -->
<div class="form-box" id="registration-div">
    <h1>Register with Mobile</h1>
    <form action="{{ route('sign-up') }}" method="post" style="text-align: center;margin-top: 50px;">
        @csrf
        <div class="form-group">
            <label for="name">Name</label>
            <input class="form-control" id="name" type="text" name="name">
        </div>
        <div class="form-group">
            <label for="mobile_no">Mobile No.</label>
            <input class="form-control" id="mobile_no" type="text" name="mobile_no">
        </div>
        <p id="register-error-message" class="text-danger"></p>
        <button type="button" id="register-btn" class="btn btn-primary">Register</button>
    </form>
</div>

<!-- OTP Section -->
<div class="form-box" id="otp-div" style="display: none;">
    <h1>OTP Sent to</h1>
    <h4 id="censored-mobile-no"></h4>
    <div style="text-align: center;margin-top: 50px;">
        <div class="form-group">
            <label for="otp">Enter OTP</label>
            <input class="form-control" id="otp" type="number" min="0" max="6" name="otp">
        </div>
        <p id="otp-error-message" class="text-danger"></p>
        <button type="button" id="verify-otp-btn" class="btn btn-primary">Submit</button>
    </div>
</div>

<!-- reCaptcha -->
<div id="recaptcha-container"></div>

<!-- JQUERY, BOOTSTRAP -->
<script src="https://code.jquery.com/jquery-3.5.1.min.js"></script>
<script src="https://stackpath.bootstrapcdn.com/bootstrap/3.4.1/js/bootstrap.min.js"></script>

<!-- FIREBASE SCRIPT HERE -->

</body>
</html>Step 4 : Initialize Script
Add this scripts on bottom of register / login blade file.
<!-- Firebase : Initialize App -->
<script src="https://www.gstatic.com/firebasejs/8.4.1/firebase-app.js"></script>
<!-- Firebase : Manage SMS / OTP -->
<script src="https://www.gstatic.com/firebasejs/8.4.1/firebase-messaging.js"></script>
<!-- Firebase : Auth / Verify OTP -->
<script src="https://www.gstatic.com/firebasejs/8.4.1/firebase-auth.js"></script>Initializing App and Add Recaptcha Verification
var windowReloadConfirm = false;

// initializing app
const firebaseConfig = {
    apiKey: "AIzaSy**********************",
    authDomain: "laravel**********************",
    projectId: "laravel**********************",
    storageBucket: "laravel**********************",
    messagingSenderId: "**********************",
    appId: "**********************"
};

firebase.initializeApp(firebaseConfig);


// recaptcha verification
$(document).ready(function() {
    window.recaptchaVerifier = new firebase.auth.RecaptchaVerifier('recaptcha-container', {
        'size': 'invisible',
        'callback': function (response) {
            console.log('recaptcha resolved');
        },
        'expired-callback': function() {
            console.log("expired-callback");
        }
    });
});Registration flow upon clicking the register button :
1. Verify the reCAPTCHA.
2. Save user details (e.g. mobile number and name) via AJAX.
3. Upon successfully saving the details, request an OTP using Firebase's 'signInWithPhoneNumber'.
4. Show OTP form, Verify It and Login
But first, we need to update the user table fields in the database. Use the following users migration.
Schema::create('users', function (Blueprint $table) {
    $table->id();
    $table->string('name');
    $table->string('account_type');
    $table->string('mobile_no')->nullable();
    $table->string('email')->nullable();
    $table->timestamp('email_verified_at')->nullable();
    $table->string('password')->nullable();
    $table->string('profile')->nullable();
    $table->rememberToken();
    $table->timestamps();
});After migrating user table let's start by examining 'signUp' function the existing function in 'FirebaseAuthController' that handles saving the details.
use App\Models\User;
use Illuminate\Http\Request;


public function signUp(Request $request)
{
    if ($request->isMethod('POST') && $request->ajax())
    {
        $postArr = [
            'account_type' => 'mobile',
            'name' => $request->name,
            'mobile_no' => $request->mobile_no,
        ];

        User::updateOrCreate(
            [
                'mobile_no' => $request->mobile_no
            ], $postArr
        );

        return response()->json([
            'status' => 'success',
            'message' => 'Register Successfully',
            'mobile_no' => $request->mobile_no
        ]);
    }

    return view('firebase.auth.register');
}Make sure to add fillable in User.php
protected $fillable = [
    'name',
    'account_type',
    'mobile_no',
    'email',
    'password',
    'profile',
];Before we jump to script lets add login function in 'FirebaseAuthController', We will be using this function to login user after OTP is verified.
public function loginOtp(Request $request)
{
    $user = User::where('mobile_no',$request->mobile_no)->first();
    auth()->login($user);
    return true;
}Let's dive into the script. I'll break it down step-by-step for clarity. This code handles the registration process by verifying reCAPTCHA, saving user details via AJAX, and requesting an OTP using Firebase. It also manages the UI changes and error handling throughout the process.
$(document).on('click', '#register-btn', function(e) {
    e.preventDefault(); // Prevent the default form submission behavior

    // Alert if the user tries to refresh/reload the page
    windowReloadConfirm = true;

    // Disable the register button and show a processing message
    $(this).prop('disabled', true);
    $(this).html('Processing...');
    $('#register-error-message').text(''); // Clear any previous error messages

    var appVerifier = window.recaptchaVerifier; // Get the reCAPTCHA verifier instance

    var form = $(this).parent('form').first(); // Get the parent form of the register button

    $.ajax({
        url: form.attr('action'), // Get the form action URL
        method: form.attr('method'), // Get the form method (POST/GET)
        data: form.serialize(), // Serialize the form data
        success: function(response) {
            if (response.status == 'success') {
                var phoneNo = '+1' + response.mobile_no; // Format the phone number with country code
                firebase.auth().signInWithPhoneNumber(phoneNo, appVerifier).then(function(confirmationResult) {
                    window.confirmationResult = confirmationResult; // Store the confirmation result globally
                    coderesult = confirmationResult; // Store the confirmation result

                    // Show the OTP input form
                    $('#otp-div').show();
                    $('#censored-mobile-no').text(maskCharacter(response.mobile_no)); // Mask and display the mobile number
                    $('#number-to-register').val(response.mobile_no); // Set the hidden input with the mobile number
                    $('#registration-div').hide(); // Hide the registration form

                }).catch(function(error) {
                    // Re-enable the register button and show an error message
                    $('#register-btn').prop('disabled', false);
                    $('#register-btn').html('Register');
                    $('#register-error-message').text('Error: ' + error);
                });
            } else {
                // Re-enable the register button and show an error message
                $('#register-btn').prop('disabled', false);
                $('#register-btn').html('Register');
                $('#register-error-message').text('Error: ' + response.message);
            }
        },
        error: function(response) {
            // Re-enable the register button and show a generic error message
            $('#register-btn').prop('disabled', false);
            $('#register-btn').html('Register');
            $('#register-error-message').text('Error: Something went wrong!');
        }
    });
});Next, we'll add an optional function to mask the mobile number. If you prefer not to use it, you can remove it from the function above.
function maskCharacter(str, mask = '*', n = 4)
{
    // Slice the string and replace with '*'
    return ('' + str).slice(0, -n)
            .replace(/./g, mask)
        + ('' + str).slice(-n);
}This code handles the OTP verification process. When the 'Verify OTP' button is clicked, it prevents the default form submission, disables the button, and processes the OTP entered by the user. If the OTP is valid, it confirms the OTP with Firebase and sends an AJAX request to verify the OTP on the server. Depending on the response, it either redirects the user to the home page or displays an error message.
$(document).on('click', '#verify-otp-btn', function(e) {
    e.preventDefault(); // Prevent the default form submission behavior

    // Disable the verify OTP button and show a processing message
    $(this).prop('disabled', true);
    $(this).html('Processing...');
    $('#otp-error-message').text(''); // Clear any previous error messages

    var code = $('#otp').val(); // Get the OTP entered by the user
    if (code.length == 6) { // Check if the OTP is 6 digits long
        confirmationResult.confirm(code).then(function(result) {
            var userNumber = $('#number-to-register').val(); // Get the user's mobile number
            $.ajax({
                url: '{{ route('login-otp') }}',
                type: 'POST',
                data: {
                    mobile_no: userNumber,
                },
                success: function(response) {
                    windowReloadConfirm = false; // Allow page reload
                    window.location = "{{ route('home') }}"; // Redirect to the home page on success
                },
                error: function(err) {
                    // Re-enable the verify OTP button and show a generic error message
                    $('#verify-otp-btn').prop('disabled', false);
                    $('#verify-otp-btn').html('Submit');
                    $('#otp-error-message').text('Error: Something went wrong!');
                },
            });
        }).catch(function(error) {
            // Re-enable the verify OTP button and show an error message
            $('#verify-otp-btn').prop('disabled', false);
            $('#verify-otp-btn').html('Submit');
            $('#otp-error-message').text('Error: ' + error);
        });
    } else {
        // Re-enable the verify OTP button and show an invalid code error message
        $('#verify-otp-btn').prop('disabled', false);
        $('#verify-otp-btn').html('Submit');
        $('#otp-error-message').text('Error: Code is invalid.');
    }
});As you can see, I haven't included the CSRF token in the AJAX request. Instead of passing the CSRF token in AJAX, let's exclude CSRF verification for all routes that start with 'ajax'. To do that open a middleware located in app/Http/Middleware/VerifyCsrfToken.php
<?php

namespace App\Http\Middleware;

use Illuminate\Foundation\Http\Middleware\VerifyCsrfToken as Middleware;

class VerifyCsrfToken extends Middleware
{
    protected $except = [
        '/ajax/*'
    ];
}Step 5 : Login
With the OTP registration process completed, let's move on to the login. Since we've covered the registration process in detail, we'll keep the login process brief as it is relatively straightforward.
Note : For testing, you can use your own number with the country code. However, if you prefer not to use your phone, refer to the last point where we explain how to create a test number in the Firebase Console.
For the login process, copy everything from the registration page and paste it into the login page. Then, replace registration form with login.
<!-- Mobile number will be placed here for login after OTP Verification, You can store in JS variable as well -->
<input type="hidden" id="number-to-login">


<!-- Login Section -->
<div class="form-box" id="login-div">
    <h1>Login with Mobile</h1>
    <div style="text-align: center;margin-top: 50px;">
        <div class="form-group">
            <label for="mobile_no">Mobile No.</label>
            <input class="form-control" id="mobile_no" type="text" name="mobile_no">
        </div>
        <p id="login-error-message" class="text-danger"></p>
        <button type="button" id="login-btn" class="btn btn-primary">Login</button>
    </div>
</div>Now, replace the registration script with the login script. In this script, we'll only change the method of passing data, IDs, and the endpoint. Everything else will remain the same.
$(document).on('click', '#login-btn', function(e) {
    e.preventDefault(); // Prevent the default form submission behavior

    // Alert if the user tries to refresh/reload the page
    windowReloadConfirm = true;

    // Disable the login button and show a processing message
    $(this).prop('disabled', true);
    $(this).html('Processing...');
    $('#login-error-message').text(''); // Clear any previous error messages

    var appVerifier = window.recaptchaVerifier; // Get the reCAPTCHA verifier instance

    var mobileNo = $('#mobile_no').val(); // Get the mobile number entered by the user

    $.ajax({
        url: '{{ route('verify-mobile') }}',
        method: 'post',
        data: {
            mobile_no: mobileNo,
        },
        success: function(response) {
            if (response.status == 'success') {
                var phoneNo = '+1' + response.mobile_no; // Format the phone number with country code
                firebase.auth().signInWithPhoneNumber(phoneNo, appVerifier).then(function(confirmationResult) {
                    window.confirmationResult = confirmationResult; // Store the confirmation result globally
                    coderesult = confirmationResult; // Store the confirmation result

                    // Show the OTP input form
                    $('#otp-div').show();
                    $('#censored-mobile-no').text(maskCharacter(response.mobile_no)); // Mask and display the mobile number
                    $('#number-to-login').val(response.mobile_no); // Set the hidden input with the mobile number
                    $('#login-div').hide(); // Hide the login form

                }).catch(function(error) {
                    // Re-enable the login button and show an error message
                    $('#login-btn').prop('disabled', false);
                    $('#login-btn').html('Login');
                    $('#login-error-message').text('Error: ' + error);
                });
            } else {
                // Re-enable the login button and show an error message
                $('#login-btn').prop('disabled', false);
                $('#login-btn').html('Login');
                $('#login-error-message').text('Error: ' + response.message);
            }
        },
        error: function(response) {
            // Re-enable the login button and show a generic error message
            $('#login-btn').prop('disabled', false);
            $('#login-btn').html('Login');
            $('#login-error-message').text('Error: Something went wrong!');
        }
    });
});We are now at the final stage of the login process: mobile verification. In this function, we will check whether the mobile number is registered or not, So open 'FirebaseAuthController'
public function verifyMobile(Request $request)
{
    $user = User::where('mobile_no',$request->mobile_no)->count();
    if($user > 0)
    {
        return response()->json([
            'status' => 'success',
            'message' => 'Verified Successfully',
            'mobile_no' => $request->mobile_no
        ]);
    }
    else
    {
        return response()->json([
            'status' => 'error',
            'message' => 'There is no account registered with this mobile number.',
            'mobile_no' => $request->mobile_no
        ]);
    }
}Since we've kept the login process brief, here's a checklist to ensure everything is in place :
1. Hidden field or variable for storing the number.
2. 'windowReloadConfirm' variable to prompt before the user reloads the page.
3. 'firebaseConfig' / Initializing App
4. reCaptcha container
5. reCaptcha script
6. Login / Registartion script
7. OTP verification script
8. Number masking script. (optional)
Step 6 : Test Number
If you're tired of entering your number and waiting for SMS, here's a tip to create a test login number :
1. Go to your firebase console
2. Navigate to 'Authentication' -> 'Sign-in method'
3. Click on the pencil icon in the phone column.
4. In the popup that appears, scroll down and add this testing number: '+1 650-555-3434' with OTP '000000'.